AIWB, AIWB Holster Wedge
Beginner IWB Setup: Starting Strong With AIWB Holsters

Appendix carry inside the waistband (AIWB) is one of the fastest-growing carry positions among new gun owners. If you’re just starting your concealed carry journey, getting your IWB setup right from day one makes all the difference between comfort and frustration.
At Cloudster Pillow, we’ve helped thousands of beginners find their footing with AIWB carry. This guide walks you through everything you need to know to start strong.
What Makes AIWB Different and Why It Works
The Front-of-Body Advantage
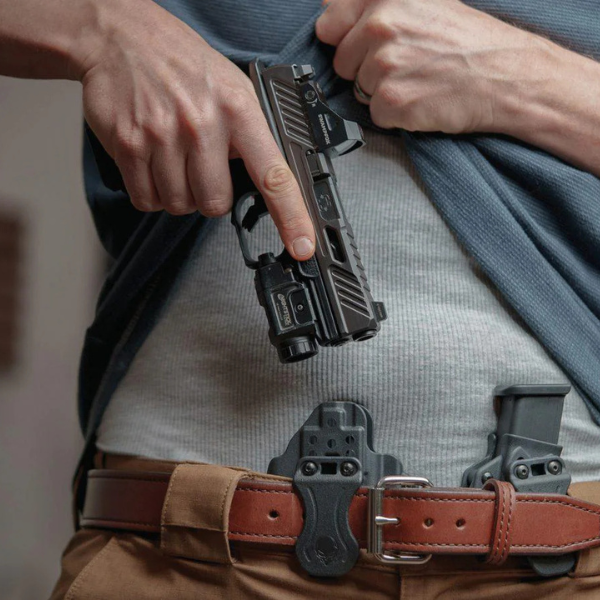
Appendix carry places your firearm directly on your front waistline, typically around the 12 to 1 o’clock position. This differs fundamentally from hip carry, where the gun sits at 3 or 4 o’clock. The front-of-body placement offers several practical advantages that make AIWB the default choice for modern concealed carriers. Your draw hand reaches the gun naturally without crossing your body, and with proper training, you can access your firearm faster from appendix than from almost any other position. Concealment also improves because larger handguns hide better when pressed against your abdomen than when they sit on your hip, where they create obvious side bulges even under loose clothing.
Real Guns, Real Results
The Glock G43X MOS and Sig Sauer P365 X-Macro demonstrate this principle in practice. Both conceal more effectively in appendix position than they would at 3 o’clock, making them top choices for beginners who want speed and concealment without compromise.
The Three Essential Components
An AIWB holster system requires three critical elements that beginners must understand. First, the holster itself holds your pistol at the correct angle and retention level. Second, a quality gun belt distributes the weight evenly across your waist and prevents sagging that destroys concealment. Third, a holster claw or wedge rotates your grip inward toward your body, dramatically reducing how much your gun prints through clothing.
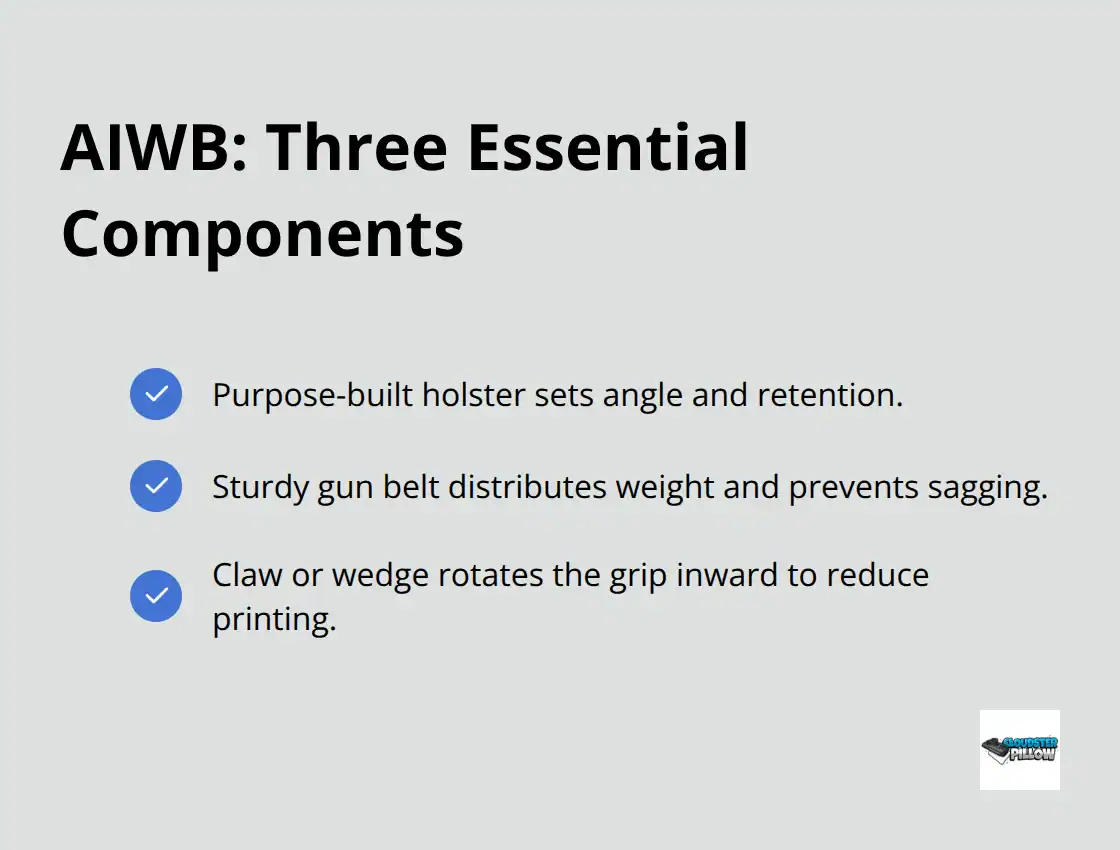
Without a claw or wedge, your grip pushes outward and creates an obvious bulge that signals your carry method to everyone around you. Many beginners skip this step and regret it immediately.
The cant angle matters too-your holster should present the gun at roughly 12 o’clock with a slight tilt toward your dominant side, which speeds up your draw without sacrificing concealment.
Why Beginners Choose Appendix Carry
Beginners select AIWB because it solves a real problem: you want fast access without broadcasting your carry method to everyone around you. Hip carry works, but it prints badly and takes longer to access. Appendix carry handles both issues at once. It becomes your default method once you train properly and dial in your setup with the right holster, belt, and support accessories. The next step is finding the exact combination that fits your body type and firearm.
Matching Your Body and Firearm to the Right Setup
Finding Your Fit
Your body type and firearm choice determine whether your AIWB setup feels comfortable or becomes a daily frustration. The Springfield Armory Hellcat and Sig P365 conceal very easily without major differences between the two, though neither gun works equally well for everyone. Test multiple holsters before committing to one. Safariland Incog X handles full-size pistols with lights and optics, while the Tulster Oath works better for carriers who value minimal profile and budget consciousness at around $80. If you have smaller hands, the Sig P365 X-Macro Comp or Glock 43X MOS present naturally, whereas larger hands benefit from the CZ P-10 C’s longer grip.
Holster Geometry and Comfort Trade-Offs
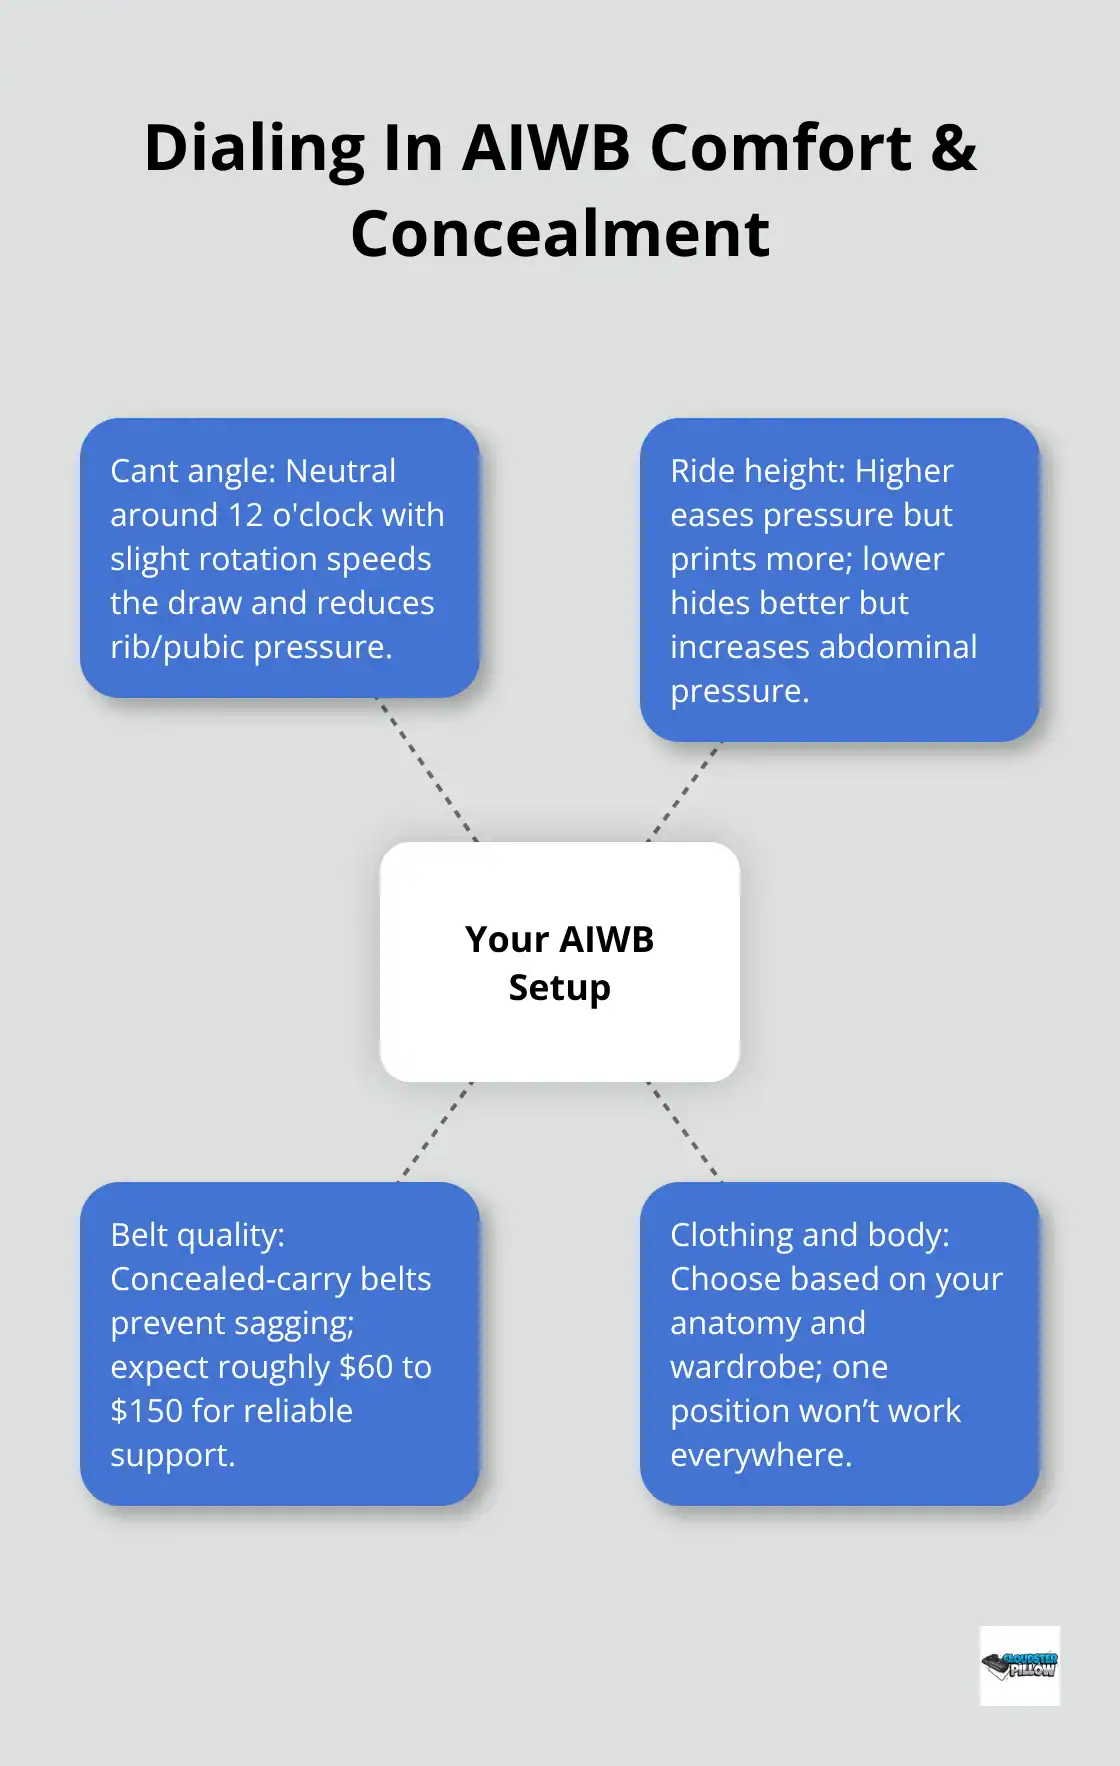
The holster claw rotates your grip inward, creating rotational force that presses the grip inward while angling the muzzle away-but cant angle matters equally, as a neutral cant around 12 o’clock with slight rotation toward your dominant hand prevents the grip from digging into your ribs or pressing against your pubic bone (two complaints that plague beginners who skip proper holster selection). Ride height creates unavoidable trade-offs: raising your holster reduces pressure on sensitive areas but increases printing at the waistline, while lowering it hides the gun better but concentrates weight on your abdomen. You cannot escape this math, so choose based on your clothing style and body anatomy rather than hoping a single position works everywhere. A quality gun belt rated for concealed carry prevents sagging that destroys both concealment and comfort, and it costs between $60 and $150-money well spent since a cheap belt negates even the best holster choice.
Accessories That Transform Your Carry
Essential accessories separate beginners who carry confidently from those who abandon appendix carry after weeks of discomfort. A holster wedge fills the gap between your body and the holster’s hard plastic, spreading force over more surface area and reducing hot spots so you feel the gun less throughout the day. Sidecar magazine carriers attached to your holster balance weight and eliminate the one-sided pull that causes clothes to shift. Foam wedges for your holster clips customize ride height without purchasing a new rig entirely, addressing the common complaint that your chosen height works for standing but fails when sitting. Clothing selection directly impacts concealment-oversized shirts and looser fits hide appendix carry far better than fitted garments, and this reality matters more than holster brand hype.
Mistakes That Derail New Carriers
Many beginners make critical mistakes during setup: they choose holsters based on reviews rather than personal fit, skip the claw entirely because they think it looks unnecessary, pair expensive holsters with cheap belts that sag immediately, and attempt appendix carry in clothing too tight for any position to work. Others carry at ride heights that feel natural standing still but fail during seated positions like driving or eating, discovering concealment gaps only after weeks of self-conscious awareness. The most damaging mistake is assuming your first holster is your final answer-successful carriers maintain a small rotation of AIWB rigs to match different clothing and daily activities rather than forcing one setup to handle everything.
Real-World Testing Reveals What Works
Test your complete system in real environments before declaring success: sit in your car, bend forward at your desk, walk around busy areas, and notice where printing appears or discomfort develops. Adjustments come from this real-world feedback, not theoretical advice. Once you dial in your holster, belt, and accessories through actual wear, you’ll move into the training phase that transforms your setup from comfortable gear into reliable muscle memory. When you’ve found your ideal configuration, the Cloudster Pillow holster wedge delivers the comfort and concealment refinement that keeps your carry sustainable for years.
Building Confidence Through Training and Practice
Start With Dry Fire Drills at Home
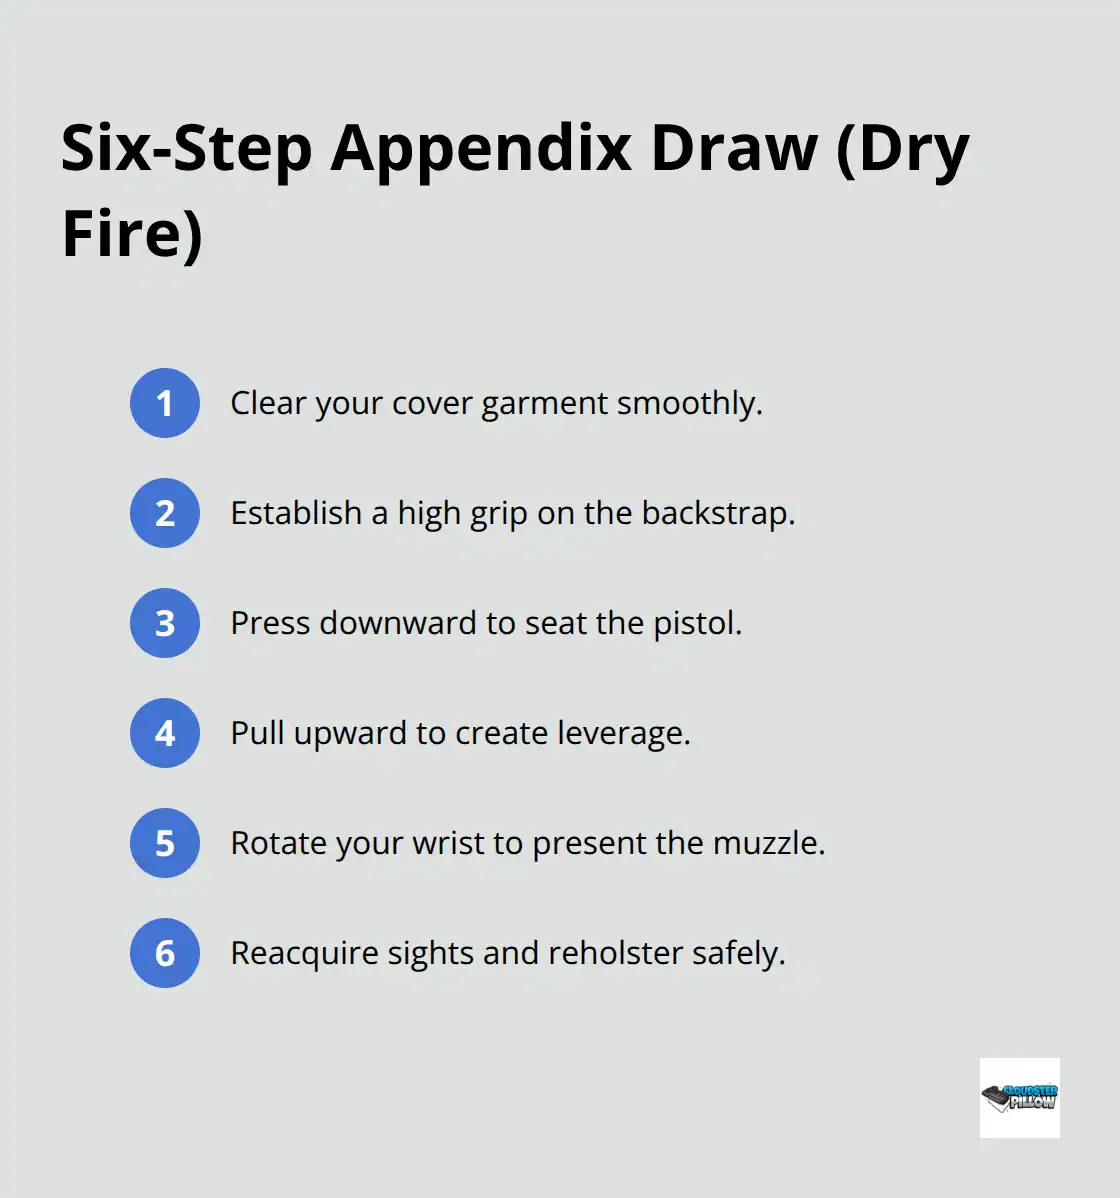
Dry fire training at home separates carriers who develop genuine speed from those who merely own a holster. Start with an unloaded firearm in a safe direction, preferably into a wall or a proper dry fire box, and practice your six-step draw sequence without ammunition present. Focus on the fundamentals: clear your cover garment smoothly, establish a high grip on the backstrap, press the gun downward into the holster before pulling upward to create leverage, then rotate your wrist to present the muzzle toward an imaginary target.
Most beginners rush this sequence and develop sloppy habits that live ammunition only magnifies later.
Perform 10 repetitions daily for two weeks before moving to live fire, and you’ll notice your draw becomes automatic rather than something you think through step-by-step. Dry fire drills help your body memorize movements like drawing from concealment, finding your sight picture, and reholstering.
Progress to Live Fire at the Range
Once dry fire feels solid, schedule live fire training at a qualified range where an instructor can observe your appendix draw from multiple positions. Pew Pew Tactical tests AIWB firearms with a minimum of 500 rounds of mixed ammunition at 5 and 7 yard distances to verify reliability, and you should shoot at least 200 rounds through your carry gun before trusting it completely. This volume of practice reveals malfunctions that light shooting would miss and builds the muscle memory that separates confidence from hope.
Train from seated positions, with your back turned, and with your hands occupied to build adaptability beyond the range. Practicing concealed carry draw techniques for seated positions ensures you’re ready to respond with confidence, no matter where you are. Most beginners neglect this reality and discover their draw fails when they actually need it.
Develop a Consistent Daily Carry Routine
Consistency matters more than intensity. Carry your firearm every single day for at least 60 days before deciding whether AIWB works for your lifestyle, because comfort develops through repetition rather than occasional weekend outings. Track where printing appears during normal activities, note which clothing works best, and adjust your holster claw or wedge based on real feedback rather than guessing.
A holster wedge reduces hot spots that plague beginners carrying for eight or more hours, spreading pressure across your abdomen instead of concentrating it in one painful area. After 60 days of daily carry combined with regular dry fire and live fire practice, you’ll understand whether your current setup truly fits your body and lifestyle or whether adjustments are necessary. This timeline matters because most carriers quit within the first month due to discomfort or perceived printing, yet those same carriers would succeed with minor tweaks given another 30 days of consistent wear. Your daily carry routine becomes sustainable only when you’ve invested enough repetition that the gun feels like part of your clothing rather than an uncomfortable burden.
Final Thoughts
Starting your AIWB journey means accepting that comfort and concealment improve through deliberate choices, not luck. Your IWB setup succeeds when you match your body type to the right holster, invest in a quality gun belt, and commit to daily carry long enough for the position to feel natural. Most beginners quit within the first month because they expect immediate comfort, yet those same carriers would thrive with 30 more days of consistent wear and minor adjustments based on real feedback.
Test your complete system in actual environments before declaring it final-sit in your car, bend at your desk, and notice where printing appears or discomfort develops. Practice dry fire drills at home until your draw becomes automatic, then progress to live fire with at least 200 rounds through your carry gun. Carry daily for 60 days minimum to understand whether your current setup truly fits your lifestyle or needs refinement.
A holster wedge reduces the hot spots that plague all-day carriers, spreading pressure across your abdomen instead of concentrating force in one painful area. This single accessory transforms setups that felt uncomfortable into rigs you forget you’re wearing. Success with appendix carry depends on your willingness to adjust based on what your body tells you during actual wear, and we at Cloudster Pillow built our holster wedge specifically for carriers who want real comfort without replacing their entire holster system.