Carry Techniques and Optimization, Concealed Carry Clothing, Holster Wedge
Printing Reduction Strategies for Stealthy Concealment
Printing happens when your concealed carry firearm creates a visible outline through your clothing. It’s one of the biggest challenges CCW carriers face, and it can compromise your entire carry setup in seconds. Understanding effective printing reduction strategies is essential for every concealed carrier.
[toc]At Cloudster Pillow, we know that printing reduction strategies aren’t just about looking tactical — they’re about staying truly concealed when it matters. Whether you’re running errands in Southern California or commuting through downtown Los Angeles, small adjustments to your holster position, clothing, and body awareness can make a massive difference.
What Printing Looks Like and Why It Matters
How Different Holster Styles Reveal Your Firearm
Printing reveals itself in different ways depending on your holster style and body position. With IWB holsters, the grip outline becomes the primary culprit — the back of your pistol’s handle creates a visible bulge that shows through fabric, especially when you bend, sit, or reach. The muzzle can also print, particularly if your ride height sits too low or your cant fails to tuck the firearm close enough to your body. AIWB carriers face a different challenge: the entire weapon profile tends to show at the waistline, and any forward lean exposes the grip immediately.
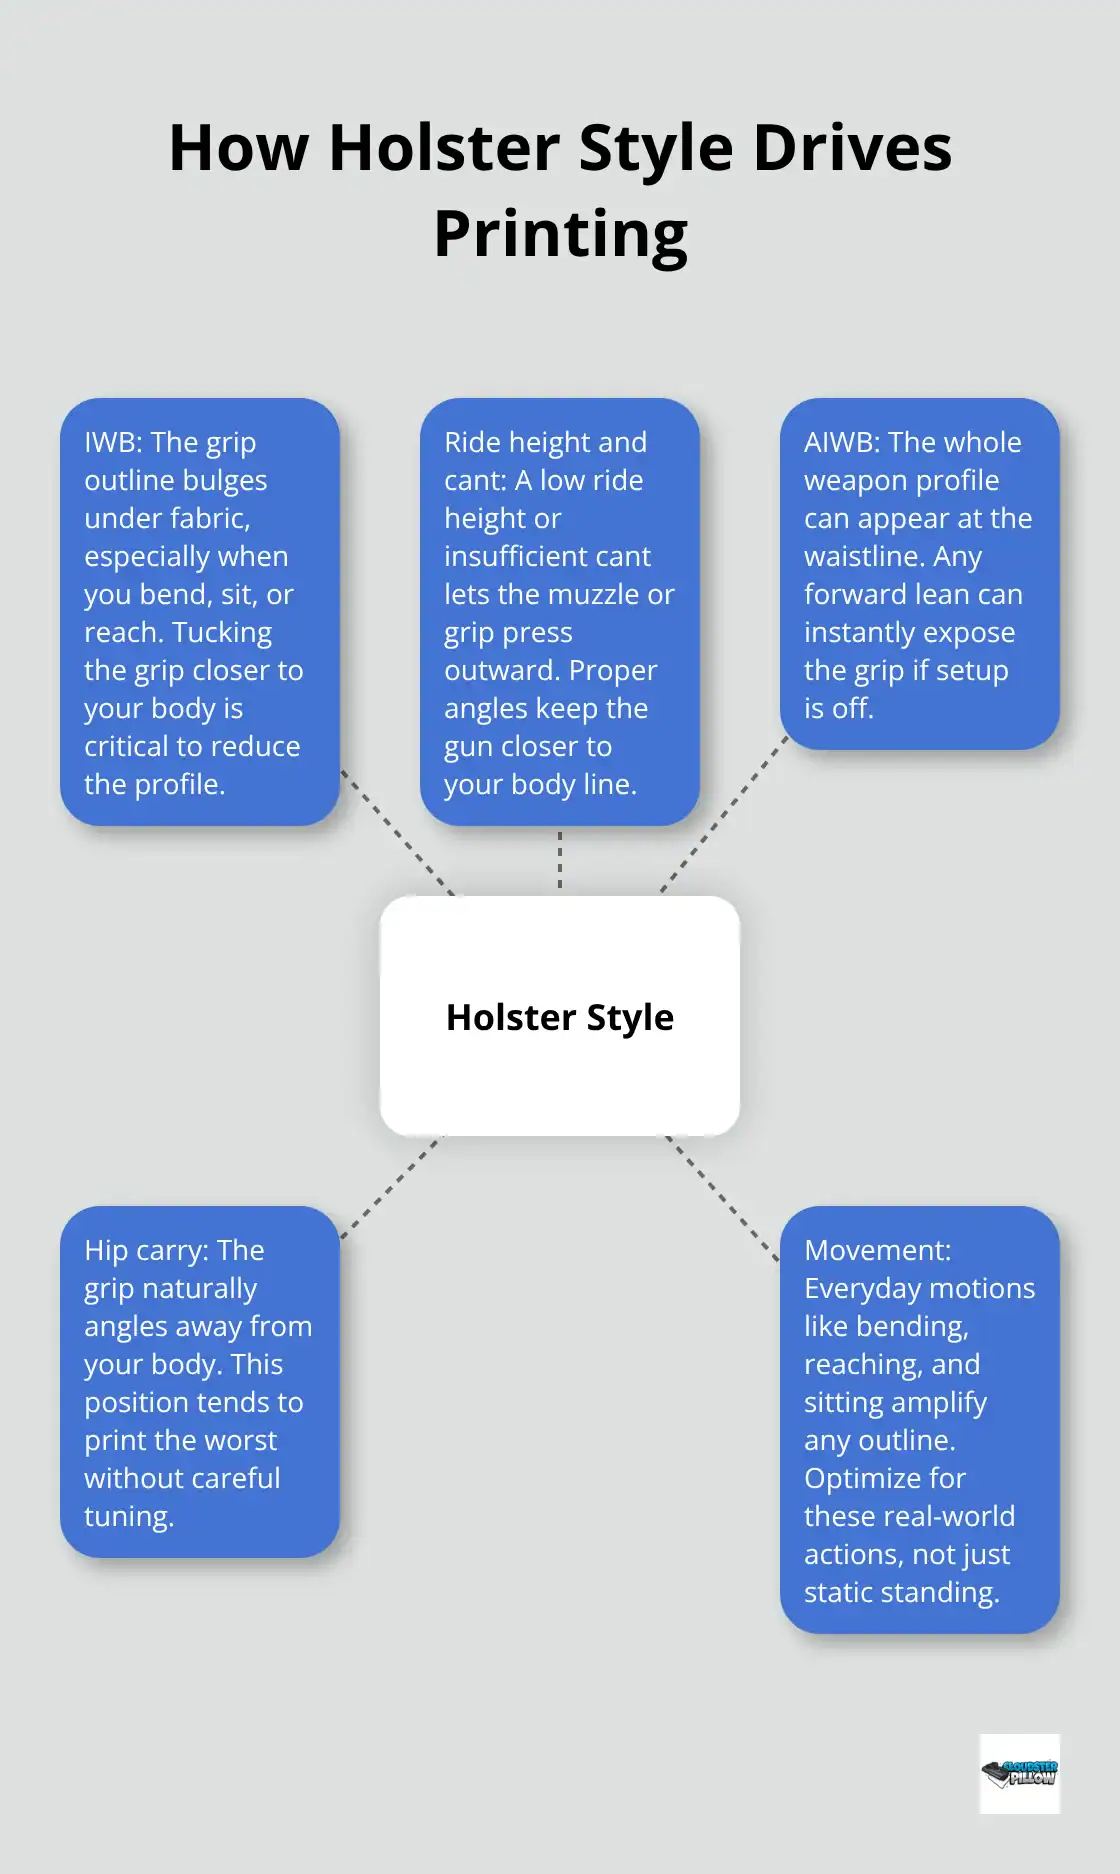
Hip carry, which remains popular for comfort, prints worst of all because the grip naturally angles away from your body rather than toward it. Understanding these patterns is the first step in any effective printing reduction strategy. For a comprehensive overview of how holster wedges solve printing issues, check our complete guide.
Identifying Your Personal Printing Problem
Understanding where your specific setup prints is the first step toward fixing it. Spend time in front of a mirror and perform everyday movements — sit in a car, reach for items on shelves, bend over — and note exactly which part of the gun shows through your clothing. This simple exercise reveals patterns you might miss during normal daily activity and helps you choose the right printing reduction strategies for your body type.
Why Printing Defeats the Purpose of Concealed Carry
Printing alerts people around you that you’re carrying, which defeats the entire purpose of concealed carry. More importantly, it marks you as an armed person to anyone with bad intentions, potentially making you a target. For everyday carriers in places like Thousand Oaks, Ventura County, or anywhere across the U.S., it creates anxiety about whether your concealment actually works.
Your carry setup only succeeds when nobody knows the gun is there. The gap between a setup that prints slightly and one that doesn’t print at all determines whether you carry with confidence or constant worry.
Printing Reduction Strategies That Work Right Now
Reposition Your Holster First
The fastest way to stop printing is repositioning your holster before you change anything else. Most carriers default to carrying at the 3 o’clock position directly on the hip, which almost guarantees printing because the grip angles outward into your clothing. Shift your holster two to four inches forward toward your appendix, and the grip naturally tucks closer to your body.
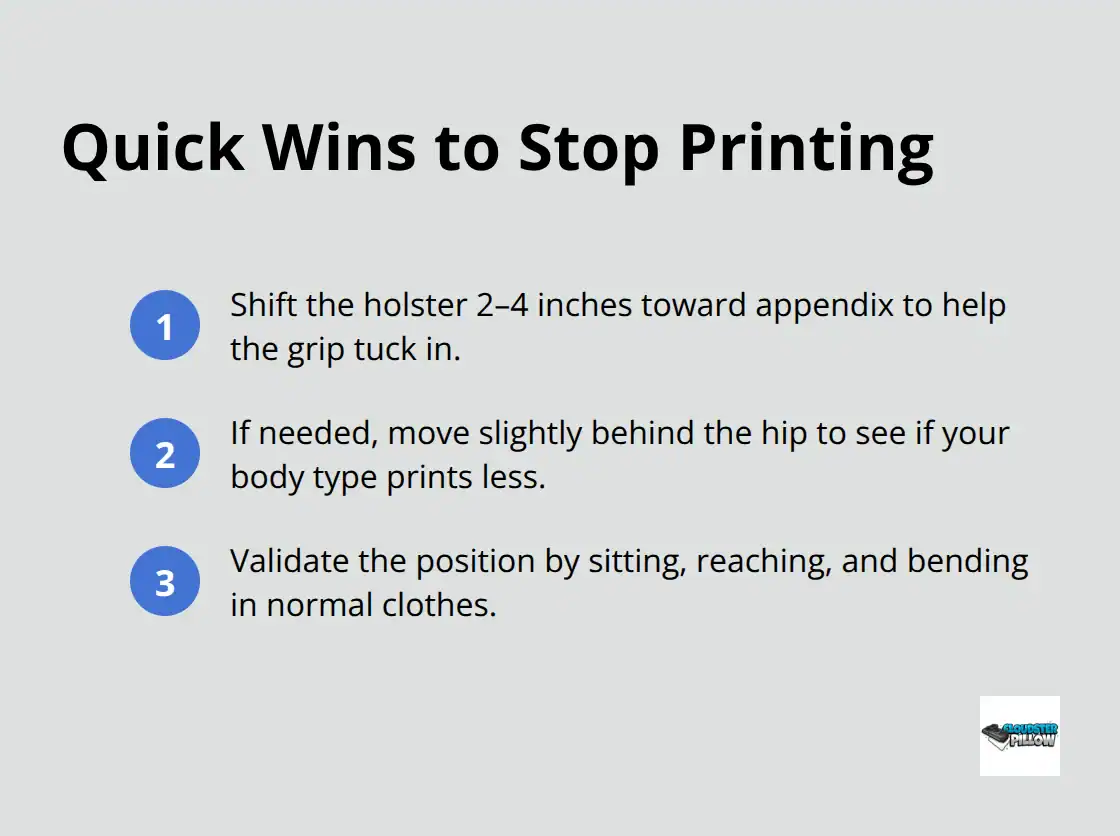
If forward carry feels uncomfortable, try moving the holster slightly behind the hip instead — some body types print less when the grip sits toward the 4 o’clock position.
Choose Clothing That Conceals
Your clothing choices matter more than most carriers admit. Tight or fitted shirts guarantee printing no matter what holster position you choose, while looser, untucked shirts in heavier fabrics hide firearms effectively. Choose relaxed-fit button-ups, polo shirts, or holster-specific tops that drape without clinging to your waistline. Avoid shiny or thin fabrics that highlight outlines — matte finishes and textured weaves break up the gun’s silhouette. Proper clothing selection is one of the most effective printing reduction strategies available.
Layering works because it adds visual noise that masks the firearm’s shape. An undershirt under your outer garment creates separation and makes prints nearly invisible.
Invest in a Quality Concealment Belt
Your belt deserves serious attention because it directly controls how your holster sits against your body. A stiff, wide concealment belt keeps your holster rigid and stable. This stability directly reduces printing because the holster cannot angle or twist as you move. Most carriers underestimate how much belt quality affects concealment — upgrading your belt often beats upgrading your holster.
Fine-Tune Your Setup With Accessories
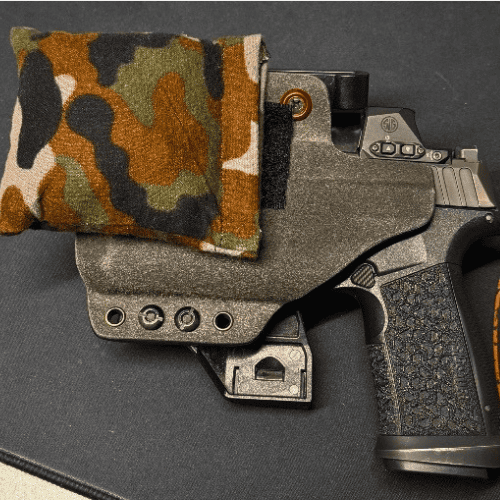
Small accessories create measurable improvements in concealment when your holster position and clothing are already optimized. Holster wedges push the grip closer to your body and flatten the silhouette under clothing — they work best when paired with proper cant and ride height adjustments. The Cloudster Pillow holster wedge uses adjustable cooling gel memory foam designed specifically to eliminate printing for IWB and AIWB setups.
Fine-Tuning Your Setup for Maximum Concealment
Adjust Cant and Ride Height for Your Body Type
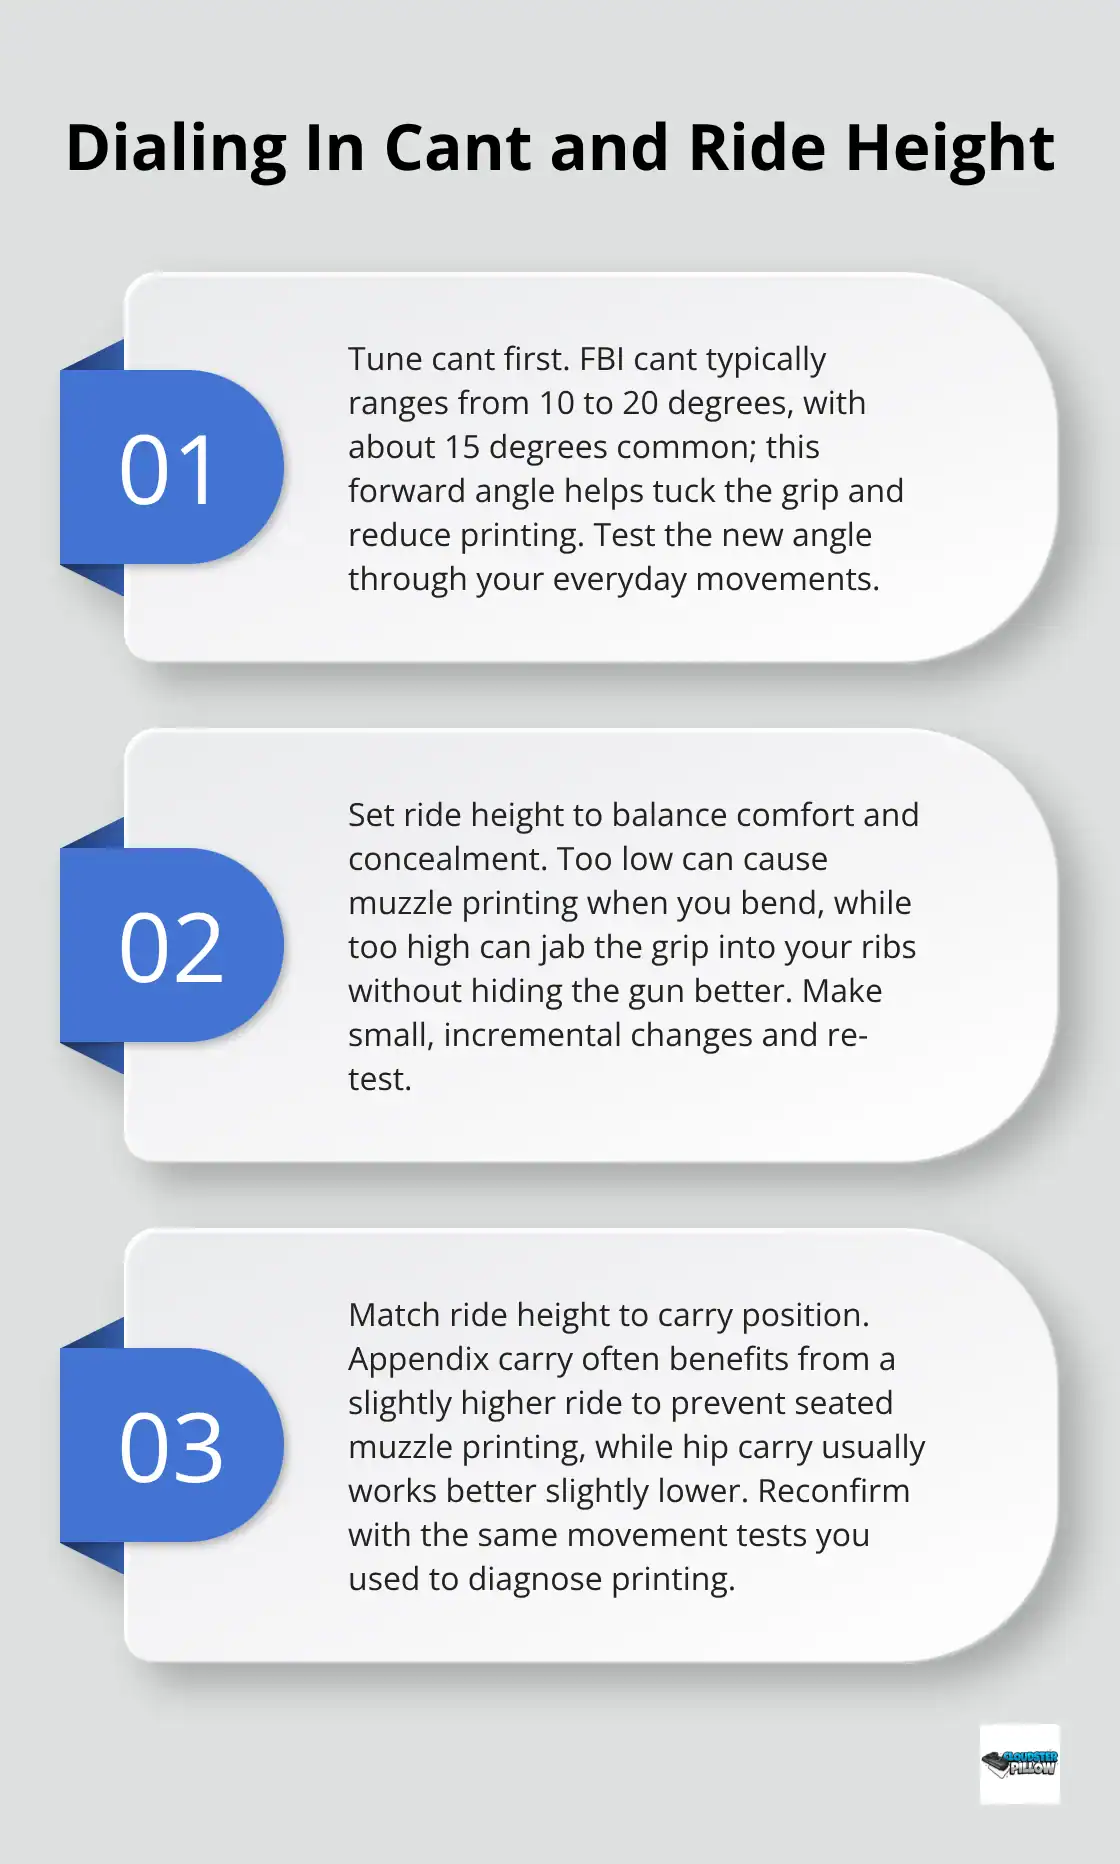
Cant and ride height control how your firearm sits under clothing, and small adjustments create dramatic concealment improvements. FBI cant is usually between 10 or 20 degrees forward, which tucks the grip closer to your body and reduces printing significantly. These printing reduction strategies work across all body types and holster styles.
Ride height determines how high or low the firearm sits on your waistband. A lower ride height can create muzzle printing when you bend forward, while too high a ride height forces the grip into your ribcage. Your carry position influences what ride height works best: appendix carry typically requires a higher ride to prevent muzzle printing when seated.
Use Holster Wedges to Flatten Your Silhouette
Holster wedges address printing that persists after you optimize position, cant, and clothing. A wedge pushes the grip closer to your body and flattens the silhouette, which works especially well for appendix carry. The right wedge designed for your specific holster model can transform a setup that prints into one that disappears completely.
Build Concealment Awareness Through Dry-Fire Practice
Develop natural concealment awareness through regular dry-fire practice in your actual carry clothing. Practice drawing from concealment in front of a mirror, then perform the same movements that revealed your original printing problem. Spend fifteen minutes weekly practicing in realistic clothing and positions. Combining physical practice with proven printing reduction strategies accelerates your progress toward invisible carry.
Frequently Asked Questions
What is the fastest way to stop my holster from printing?
Repositioning your holster is the fastest fix. Move it two to four inches forward from the 3 o’clock position toward your appendix, which naturally tucks the grip closer to your body. Pair this with a quality holster wedge for the best results.
Do holster wedges actually reduce printing?
Yes. A holster wedge pushes the grip inward toward your body and flattens the silhouette under clothing. The Cloudster Pillow holster wedge uses adjustable cooling gel memory foam to eliminate printing for both IWB and AIWB carry setups.
What clothing works best for concealed carry without printing?
Looser, untucked shirts in heavier fabrics with patterns or textured weaves work best. Avoid tight, thin, or shiny materials. Layering with an undershirt adds visual noise that masks the firearm’s shape under your outer garment.
Final Thoughts
Printing reduction strategies work because they address the root causes of visibility rather than just the symptoms. Repositioning your holster, selecting proper clothing, upgrading your belt, and fine-tuning cant and ride height create measurable improvements in concealment. The real power comes from combining these printing reduction strategies rather than relying on any single fix.
We at Cloudster Pillow designed our holster wedge specifically to address printing that persists after you optimize position and clothing. Start with repositioning and clothing adjustments, then add a wedge if printing remains visible. Your personal concealment solution won’t look like anyone else’s, so test your setup across the movements that matter to you.