
AIWB, Holsters and Gear Recommendations, IWB Holster Wedge
How to Make a DIY Holster Wedge (and When to Upgrade)
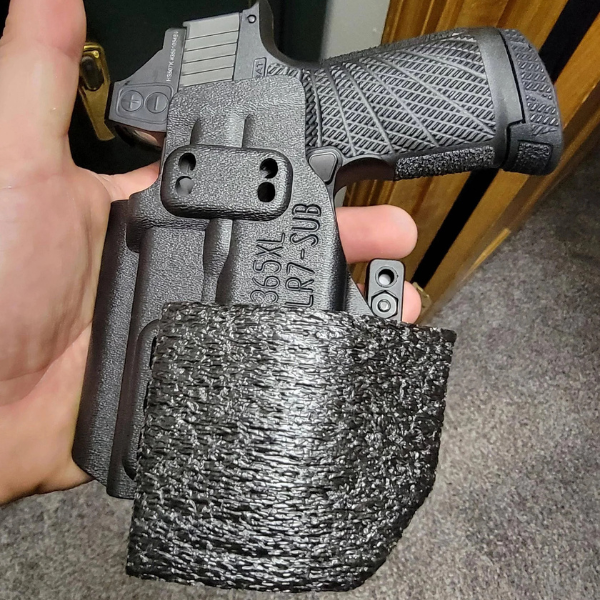
Quick answer: To make a DIY holster wedge, cut a tapered piece of closed-cell foam (or a gel shoe insert) to fit the lower body-side of your holster, then attach it with adhesive hook-and-loop: the soft loop side goes on the holster, the hook side on the wedge. Keep it low, toward the muzzle, so it pushes the muzzle out and tips the grip in. It costs a few dollars and is a good way to prove a wedge helps you. Homemade wedges tend to flatten, slip and trap sweat, though, so once you know you want one, a purpose-built wedge like the Cloudster Pillow holds its shape and lets you adjust the fill.
How to Make a DIY Holster Wedge (Step by Step)
What you’ll need:
- A piece of firm-but-squishy closed-cell foam (an EVA foam block or craft-foam sheet), or a gel shoe insert
- Adhesive-backed hook-and-loop (Velcro)
- Scissors or a sharp utility knife, and a marker
- Rubbing alcohol and a cloth, to clean the holster before the adhesive goes on
The steps:
- Unload first. Remove the gun from the holster and clear it before you start. Do every fitting and test with an unloaded gun or a dummy.
- Trace and cut a tapered shape. Hold the foam against the body-facing side of the holster and mark the lower part. Cut a wedge that’s thicker at the bottom (muzzle end) and tapers thinner toward the top. Start thinner than you think you need; it’s easier to add a layer than to undo a cut.
- Clean the holster. Wipe the spot where the wedge will sit with rubbing alcohol and let it dry, so the adhesive can grip.
- Attach the hook-and-loop. Stick the soft loop side to the holster, low and on the side that touches your body. Stick the rough hook side to the wedge. Give the adhesive time to set before you carry; ours reaches full strength after 24 hours, and craft-store adhesives can take as long or longer.
- Check that nothing interferes. The wedge must not cover the trigger guard, the holster mouth or any retention screw, and it must not stop the holster from staying open for reholstering.
- Wear it and adjust. Carry it around the house for a day. Look in a mirror standing, sitting and bending. If the grip still prints, add thickness at the bottom; if it digs in, trim or move it. Our wedge placement guide shows where it usually sits for appendix and strong-side carry.
That’s the whole DIY process, and it’s worth doing once: it proves to you whether a wedge fixes your printing and pressure. Firearms instructor Melody Lauer’s version of this, using a gel shoe insert and adhesive hook-and-loop, was written up by Guns.com in 2018 and is still one of the most common DIY methods.
What a Holster Wedge Actually Does
A wedge sits low on the body side of an inside-the-waistband holster. It pushes the muzzle away from your body, which tips the grip in toward you. That does three things:
- Tucks the grip in so it prints less under a shirt.
- Spreads pressure from the holster’s bottom edge and corners, so there are fewer hot spots.
- Fills the gap between a flat, rigid holster and a curved body, so the holster sits the same way every day.
Whether you make one out of scrap foam or buy one, that’s the job it has to do. For appendix carry specifically, see our appendix carry pillow and wedge guide.
DIY Wedge vs. Purpose-Built Wedge
| DIY wedge (foam block, gel insole, scrap foam) | Cloudster Pillow | |
|---|---|---|
| Cost | A few dollars | $20 to $45, by size |
| Fill | One solid piece; can compress flat over time | Shredded cooling-gel memory foam that moves to fit you |
| Against your skin | Bare foam or gel | Fabric cover: bamboo (White), cotton blend (Dark) or cotton (Camo) |
| Adjusting it | Cut again or add layers | Add or remove fill |
| Attachment | Whatever hook-and-loop or glue you have | Hook-and-loop; adhesive loop strips and an alcohol wipe included |
| Consistency | Changes each time you rebuild it | Same shape and spot every day |
Where DIY Holster Wedges Usually Fail
1. The foam flattens
Yoga blocks, craft foam and mouse pads aren’t made to be squeezed against a body all day. Many crush down and stay down, so the wedge loses its angle and the printing comes back. Cheap foam can also crumble at the edges from rubbing against clothes.
2. Sweat and heat
Bare foam, gel and rubber don’t breathe. Against your skin for a full day, they get hot and sticky, and they can start to smell. A fabric-covered wedge puts cloth against your skin instead.
3. The adhesive lets go
Body heat, sweat and constant flexing are hard on adhesive, especially craft-store hook-and-loop on a holster that wasn’t cleaned first. When it loosens, the wedge shifts, and a wedge that moves changes how the gun sits in your hand on the draw.
When a DIY Wedge Makes Sense (and When to Upgrade)
DIY makes sense when:
- You’re not sure a wedge will help and want to test the idea first.
- You’re still experimenting with ride height, cant and carry position.
- You need a stopgap until a proper wedge arrives.
It’s time to upgrade when:
- You’ve rebuilt or re-stuck the wedge more than once.
- It’s flattened, it’s uncomfortable, or you’ve left the gun at home because of it.
- You want the same setup every day so your draw stays consistent.
A DIY test also teaches you what you need: where the pressure helps, and whether you need more thickness at the muzzle. That makes choosing a size easier. Our size guide matches pillow size to your gun and holster.
What the Cloudster Pillow Does Differently
- Adjustable fill: it’s filled with shredded cooling-gel memory foam. Open it to add or remove fill and dial in the thickness for your body, gun and holster.
- A soft cover: White has a bamboo cover; Dark has a cotton-blend cover and Camo a cotton cover.
- Repositionable mounting: it attaches with hook-and-loop. Adhesive loop strips and an alcohol wipe come with it, and extra strips are sold separately if you move it to another holster.
- Four sizes: Mini, Standard, Deluxe and Monster, from $20 to $45.
Comparing options? See our holster wedge comparison and our foam vs. gel wedge breakdown.
Quick Answers
What can I use to make a holster wedge?
Closed-cell foam (an EVA foam block or craft foam) or a gel shoe insert, attached with adhesive-backed hook-and-loop. A folded sock works for an hour in a pinch, but it shifts and soaks up sweat.
Where does a holster wedge go?
Low on the body side of the holster, toward the muzzle. That pushes the muzzle out and tips the grip in.
Can I use a Dr. Scholl’s gel insert as a wedge?
Yes, it’s one of the most common DIY wedges. Gel doesn’t breathe, though, so it can get hot and sticky over a full day.
Which side of the Velcro goes on the holster?
The soft loop side goes on the holster and the rough hook side goes on the wedge. That’s how the Cloudster Pillow is set up too.
Will a holster pillow fix a DIY wedge that hurts?
Often, if the pain comes from foam that’s too hard, the wrong shape, or a wedge you can’t adjust. A soft, adjustable pillow lets you change all three. If it hurts because of where the holster rides, adjust ride height and position first; our placement guide covers that.
